The soft and fluffy texture of idli makes it a favorite South Indian meal. It is typically prepared with a pressure cooker and specialized molds. What happens, though, if you don’t have these tools? Remain calm! We have you covered with a simple substitute recipe for making idlis at home without them.
We’ll demonstrate in this tutorial how to create tasty idlis using basic kitchen tools that you most likely already own. Even without the traditional tools, you can still enjoy tasty homemade idlis just like the ones you’d find in South India.
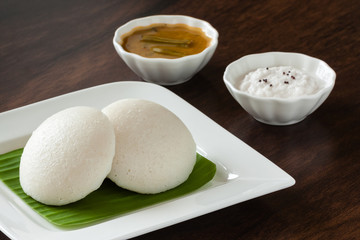
Idlis aren’t just yummy; they’re also healthy because they’re steamed and contain no oil. They’re perfect for breakfast or any time of the day, served with coconut chutney or sambar.
So, let’s dive in and learn how to make idlis the easy way, without needing special equipment!
Table of Contents

Ingredients
A. List of ingredients required for making idli batter:
- Urad dal (split black gram): Urad dal serves as the primary ingredient in idli batter, providing the necessary texture and consistency.
- Idli rice or parboiled rice: Idli rice or parboiled rice is used to add bulk and firmness to the batter, resulting in soft and fluffy idlis.
- Fenugreek seeds: Fenugreek seeds are added to aid in the fermentation process and enhance the flavor of the idli batter.
- Salt: Salt is essential for seasoning the batter and enhancing the overall taste of idlis.
- Water: Water is used for soaking the dal and rice, as well as for grinding the batter to the desired consistency.
B. Ingredients needed for steaming idlis without a stand and cooker:
- Pot with lid: A large pot with a well-fitting lid is essential for creating a steaming environment for the idlis.
- Heat-resistant bowl: A heat-resistant bowl, such as a stainless steel or glass bowl, will hold the idli batter and facilitate steaming.
- Trivet: A trivet or heatproof stand is placed inside the pot to elevate the bowl above the water level, allowing for even steaming.
- Water: Water is added to the pot to create steam for cooking the idlis.
- Smaller containers: Smaller containers, such as steel bowls or silicone molds, are used to hold the idli batter during steaming.
These ingredients are essential for preparing both the idli batter and creating a makeshift steaming setup for cooking idlis without an idli stand and cooker.
Preparation of Batter
A. Steps for Soaking and Grinding Rice and Urad dal
Soaking Rice and Urad dal:
- Rinse 2 cups of idli rice or regular rice thoroughly under running water to remove any dirt or impurities.
- Similarly, rinse 1 cup of whole or split urad dal (black gram lentils) until the water runs clear.
- Place the rinsed rice and Urad dal in separate bowls and cover them with enough water.
- Soak them for four to six hours, or even overnight. Soaking helps in softening the grains, making them easier to grind and ferment.
Grinding the Batter:
- Once the rice and Urad dal have soaked, drain the water from them.
- Transfer the soaked urad dal into a blender or wet grinder. Add water gradually as needed to facilitate smooth grinding.
- Grind the dal into a smooth and fluffy batter. It may take about 10 to 15 minutes of grinding, depending on the appliance used.
- Similarly, transfer the soaked rice into the blender or wet grinder. Add water gradually and grind until you achieve a smooth batter.
- The consistency of the batter should be thick yet pourable. It should not be too thick like dough or too thin like a pancake batter.
- Once both the rice and dal are ground, transfer them into a large mixing bowl. Mix well to combine them evenly.
B. Fermentation Process for Idli Batter
Mixing Rice and Urad dal Batter:
- Add salt to the batter according to taste. Salt aids in fermentation and enhances the flavor of the idlis.
- Mix the salt thoroughly into the batter using a spoon or clean hands. Make sure that the salt is spread evenly throughout the mixture.
Fermentation:
- Cover the bowl containing the batter with a clean kitchen towel or lid.
- Place the bowl in a warm and draft-free area of your kitchen. Ideal temperature for fermentation is around 25-30°C (77-86°F).
- Allow the batter to ferment for about 8 to 12 hours, or until it doubles in volume and develops a slightly sour aroma.
- Fermentation time may vary depending on the ambient temperature. Warmer temperatures promote faster fermentation.
- Check the batter periodically during fermentation to ensure it’s progressing well. If the batter hasn’t fermented enough, you can leave it for a few more hours.
- Once fermented, the batter will be airy and light, with tiny bubbles on the surface.
Storing Fermented Batter:
- After fermentation, gently stir the batter to deflate any excess air bubbles.
- Transfer the fermented batter into a clean, airtight container.
- Store the batter in the refrigerator if you’re not using it immediately. It can be kept refrigerated for up to 2 to 3 days.
- This prepared idli batter is now ready to be used for making idlis using the alternative steaming method outlined earlier.
Alternative Steaming Method
A. Introduction to Alternative Steaming Method:
- This method offers a solution for steaming idlis without the need for a traditional idli stand and cooker.
- It involves using commonly available kitchen equipment to achieve similar results.
B. Equipment Required:
- Pot with a tight-fitting lid: A large pot with a lid that can accommodate a heat-resistant bowl.
- Heat-resistant bowl: A bowl that can withstand high temperatures and fits inside the pot.
- Trivet: A heatproof stand or rack to elevate the bowl above the water level in the pot.
C. Step-by-Step Instructions for Steaming Idlis:
Preparing the Pot:
- Select a pot large enough to hold the heat-resistant bowl with some space around it.
- Fill the bottom of the pot with water, ensuring it’s below the level of the trivet when placed inside.
Placing the Trivet:
- Set the trivet inside the pot, ensuring it sits evenly and securely.
- The trivet should be high enough to keep the heat-resistant bowl above the water level.
Adding Water to the Pot:
- Pour enough water into the pot to create steam but ensure it doesn’t touch the bottom of the heat-resistant bowl when placed inside.
Placing the Heat-Resistant Bowl on the Trivet:
- Set the heat-resistant bowl on top of the trivet inside the pot.
- Ensure the bowl is stable and doesn’t tip over.
Pouring Idli Batter into Smaller Containers:
- Divide the idli batter into smaller, heatproof containers that fit inside the heat-resistant bowl.
- Grease the containers lightly to prevent sticking.
Placing Containers in the Bowl:
- Carefully place the filled containers inside the heat-resistant bowl.
- Arrange them evenly, leaving some space between each container for steam circulation.
Covering the Pot and Steaming Idlis:
Place the lid securely on the pot to trap steam.
After turning on the heat, gently boil the water.
Once boiling, reduce the heat to low and let the idlis steam for the required time.
D. Tips for Success:
- Monitor the water level in the pot during steaming and replenish if necessary to prevent it from drying out.
- Check the doneness of idlis with a toothpick or knife inserted into the center; it should come out clean.
- Allow the idlis to cool slightly before removing them from the containers.
This alternative steaming method offers a practical solution for making delicious idlis without the need for specialized equipment, allowing you to enjoy this traditional dish with minimal fuss.
Serving and Enjoying
A. Checking Idlis for Doneness:
- After steaming, carefully open the lid of the pot.
- Use a toothpick or a knife to insert into the center of an idli. The idlis are ready if it comes out clean.
- If the toothpick or knife comes out with batter sticking to it, steam the idlis for a few more minutes.
B. Removing Idlis from Containers:
- Turn off the heat and carefully remove the containers from the pot using kitchen mitts or tongs.
- Allow the containers to cool for a few minutes before handling to avoid burning yourself.
- Use a spoon or a knife to gently loosen the edges of the idlis from the container.
- Carefully invert the container over a plate to release the idlis. They should come out easily if the container is greased well.
C. Serving with Chutney and Sambar:
- Transfer the freshly steamed idlis onto serving plates.
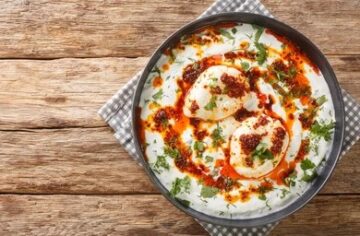
- Serve them hot with your favorite accompaniments such as coconut chutney, tomato chutney, mint chutney, or sambar.
- For an authentic South Indian experience, serve idlis with a side of sambar—a flavorful lentil-based stew made with vegetables and spices.
- Garnish the idlis with chopped coriander leaves or grated coconut for added freshness and flavor.
D. Enjoying Homemade Idlis Without Traditional Equipment:
Sit down with your family or friends to enjoy the freshly made idlis.
Take a bite of the soft and fluffy idli, savoring the delicate texture and mild flavor.
Dip the idlis into the chutney or sambar, allowing the flavors to mingle on your palate.
Enjoy the satisfaction of having made delicious idlis from scratch, even without traditional equipment like an idli stand and cooker.
Share the joy of homemade idlis with your loved ones and relish the experience of cooking and enjoying a traditional Indian dish with a modern twist.
FAQS
- Can I use any type of pot for steaming idlis without a cooker?
- Yes, you can use any large pot with a lid for steaming idlis. Just make sure it’s deep enough to accommodate the steaming setup.
- Do I need to grease the containers before pouring the idli batter?
- It’s a good idea to lightly grease the containers to prevent sticking. You can use cooking oil or butter for this purpose.
- How long does it take to steam idlis using this alternative method?
- Steaming time may vary depending on the size of your idli containers and the intensity of heat. Typically, it takes around 10-15 minutes for idlis to cook thoroughly.
- Can I use any type of bowl as a heat-resistant container for steaming idlis?
- It’s best to use a heat-resistant bowl to withstand the steam and heat during the cooking process. Glass or stainless steel bowls are suitable options.
- How do I know when the idlis are done cooking?
- Insert a toothpick or knife into the center of an idli. If it comes out clean, with no batter sticking to it, the idlis are done.
- Can I use this method to make different varieties of idlis, like rava idli or oats idli?
- Yes, you can use the alternative steaming method for making various types of idlis by adjusting the batter consistency accordingly.
- Is it necessary to ferment the idli batter for this recipe?
- Fermentation helps in making the idlis soft and fluffy. It’s recommended to ferment the batter for at least 6-8 hours or overnight for best results.
- Can I freeze leftover idlis made using this method?
- Yes, you can freeze leftover idlis in an airtight container. When ready to eat, simply steam them again to reheat.
- Can I steam other dishes using this alternative steaming setup?
- Absolutely! You can steam various dishes like dhokla, khaman, or even vegetables using the same setup. Just adjust the cooking time accordingly.
- Is it possible to make a large batch of idlis using this method?
- Yes, you can scale up the recipe to make a larger batch of idlis by using a bigger pot and more containers for steaming. Just ensure even steaming by arranging the containers properly.
Conclusion
In conclusion, To prepare delicious idlis, you don’t need expensive equipment like an idli stand or cooker.. The alternative method we’ve discussed shows that with a little creativity, you can still enjoy homemade idlis.
This way of making idlis is not only easy but also fun. Using what you have on hand and being creative in the kitchen is made possible by this. So, don’t worry if you don’t have all the traditional tools – you can still whip up delicious idlis.
Keep in mind that enjoying the process and sharing delicious meals with loved ones are more important aspects of cooking than the final product. So go ahead and try this process, enjoy yourself, and feel the thrill of creating your own idlis from scratch. Cheers to a happy kitchen!
Nutrient
| Nutrient | Quantity per Serving (1 idli) |
|---|---|
| Calories | 50-70 calories |
| Total Fat | 0.5-1 gram |
| Saturated Fat | 0 grams |
| Cholesterol | 0 milligrams |
| Sodium | 10-20 milligrams |
| Total Carbohydrates | 10-15 grams |
| Dietary Fiber | 1-2 grams |
| Sugars | 0 grams |
| Protein | 2-3 grams |
Please note that these values are approximate and may vary based on specific ingredients and portion sizes used in the recipe.
How To Make Idli Without Idli Stand & Cooker
Discover how to create fluffy and soft idlis without a special cooker or idli stand! You can make tasty idlis with this easy recipe with some basic kitchen tools. You will be eating homemade idlis in no time with only a few simple ingredients and straightforward instructions. With this simple recipe, bid complex settings a fond farewell and hello to delicious handmade food.
list of ingredients
Instructions
recipe details
-
Preparing the Batter:
a. Rinse the rice and urad dal separately under running water.
b. Soak the rice and urad dal in separate bowls with enough water to cover them completely. Add fenugreek seeds to the urad dal if using.
c. Let the rice and urad dal soak for at least 7-8 hours or overnight.
d. After soaking, drain the water from both the rice and urad dal.
e. Grind the rice and urad dal separately with fresh water to a smooth batter consistency.
The batter should neither be too thick nor too thin.
f. Mix the rice and urad dal batter together in a large bowl. Add salt and mix well.
g. Cover the bowl and let the batter ferment in a warm place for 8-10 hours or until it doubles in volume.

-
Preparing the Steaming Setup:
a. Place a trivet inside a large cooking pot.
b. Add water to the pot, ensuring it doesn't touch the trivet when heated.
c. Place a heat-resistant bowl on the trivet.

-
pour the batter
a. Grease small steel or aluminum containers with oil or ghee.
b. Pour the idli batter into the greased containers, filling them only halfway to leave room for expansion.

-
Steaming the Idlis:
a. Place the filled containers inside the heat-resistant bowl in the pot.
b. Cover the pot with a tight-fitting lid.

-
Steaming the Idlis:
a. Steam the idlis on medium heat for about 10-15 minutes or until they are cooked through. b. You can check doneness by inserting a toothpick or knife into the center of an idli; if it comes out clean, they are done.
-
ready the idli
a. Once cooked, turn off the heat and let the idlis cool slightly. b. Carefully remove the containers from the pot using tongs or oven mitts.
c. Allow the idlis to cool for a few minutes before unmolding them from the containers.

-
Serving:
a. Serve the idlis warm with chutney and sambar on the side. b. Enjoy your homemade idlis without the need for a traditional idli stand and cooker!